Heicode Manager Enterprise Guide
A complete management guide for enterprise organizations — from rule configuration and resource binding to project approval and cost observability.
Heicode Manager Enterprise Guide
Version 2026-07-28
1. Getting Started
After an enterprise organization subscribes, it needs to complete enterprise rule configuration, resource binding, and project preparation. Some governance capabilities must be enabled according to the organization's plan — rely on the features actually shown in your account.
1.1 Configure Enterprise Rules
Global configuration is used to push enterprise rules to organization members uniformly. The platform provides a default configuration that the organization can modify.
Configuration supports two editing methods:
- Fill in each item in the admin interface;
- Download the full JSON configuration file, modify it, and upload it again.
Steps:
- Go to Organization & People and switch to the Global Configuration tab. This page is only open to the organization owner and admins.
- Set the models available to members. The default stance is "members can use all models covered by your plan"; pick the ones you don't want members to use under Disabled models. You can also use Disable by series to record all current models of a series at once. Note: disabling by series only records the models present at that moment — models added to that series later are not disabled automatically, and you must save again to include them.
- To switch to an allowlist stance, turn on Members can only use models you allow and list the allowed models in the configuration. If the switch is on but the list is empty, members will have no models available, and the page will warn you.
- Set the default model. If the selected default model is in the disabled list, the page will block it and prompt you to choose another.
- Set the three feature switches as needed: Auto mode, Skip action confirmation, and Auto-trust tool connections bundled with the project. Each can be set to disallowed.
- In Organization rules (natural-language restrictions), write your enterprise's development conventions. The input box contains a sample template — replace it entirely.
- For offline editing, click Download JSON to export the full configuration, modify it, then use Upload JSON to send it back; click Discard changes to abandon this round of edits.
- Click Save to organization. The confirmation dialog shows how many items changed and the resulting policy state; confirm to complete the save. After a successful save, the page shows a version number.
Note: Saving only records the configuration on the organization. Making the configuration actually take effect for members requires the platform to enable it separately; this is not yet enabled, and the interface shows that notice.
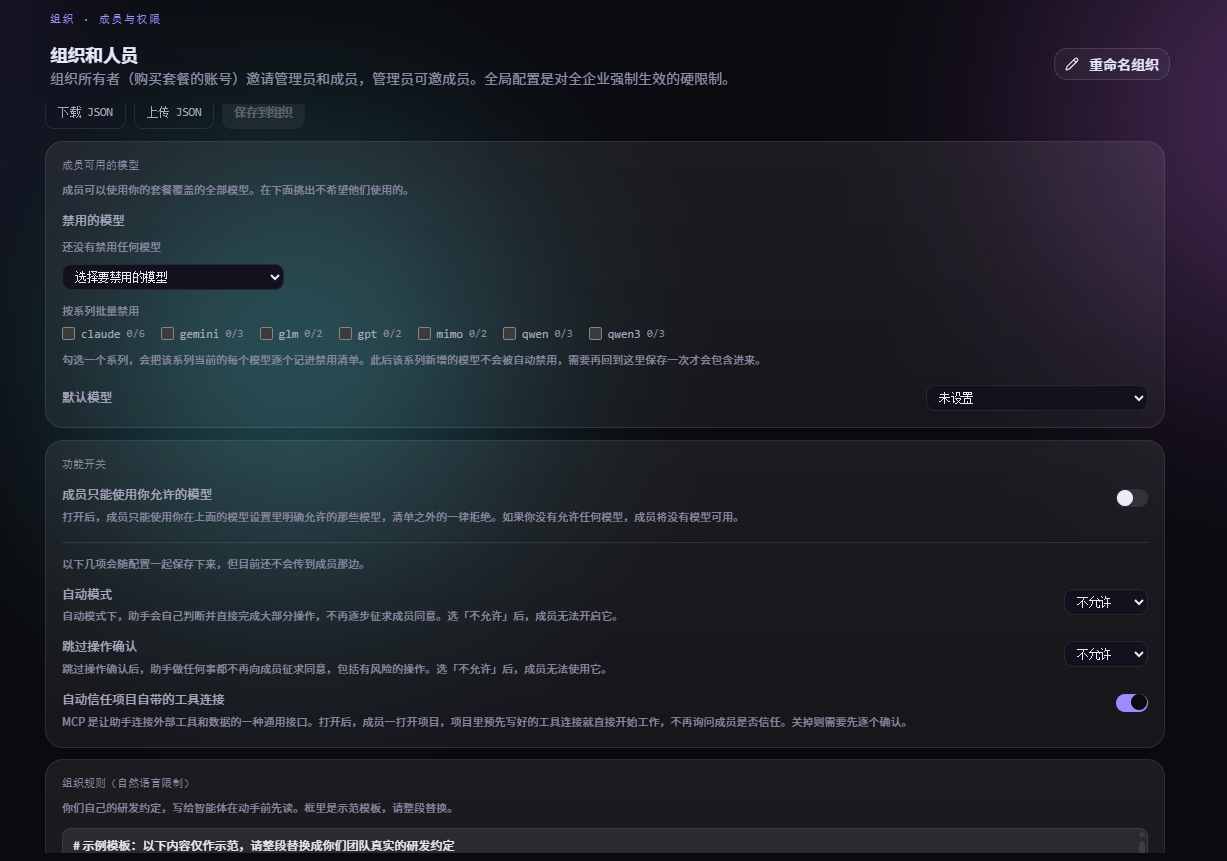
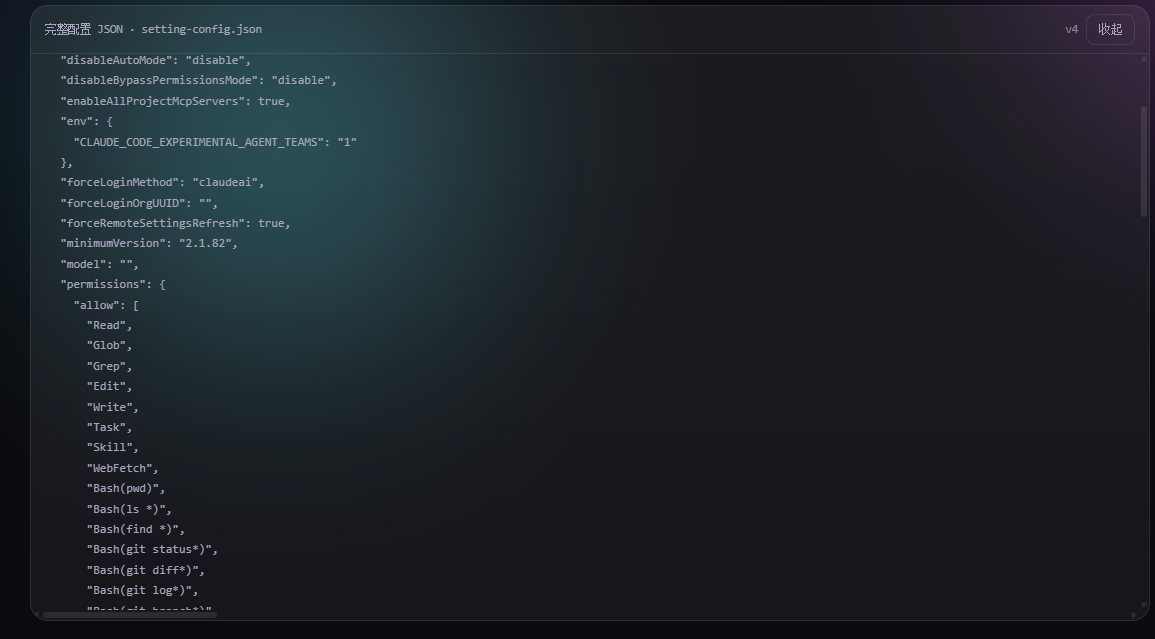
The main configuration areas include:
- Available models: specify the models organization members may use;
- Enterprise rules: use natural language to describe development standards and operational restrictions — for example, production operations require human confirmation;
- Feature switches: control which related features the organization allows.
Saving the global configuration updates the entire configuration, so confirm your changes before saving. To enable configuration push, contact service support.
1.2 Bind and Grant Enterprise Resources
Development resources are bound and managed centrally by the enterprise. Members can only use resources the enterprise has granted to them and cannot bind personal resources themselves.
Resources that can currently be managed include:
- Code repositories;
- MySQL and PostgreSQL databases;
- Virtual machines;
- Object storage;
- MCP connections and skills.
GitHub supports binding by organization and scanning the repositories under it; Gitea and GitLab are bound per repository. Code repository credentials need the read/write permissions required for the corresponding development operations.
When binding a resource, you can set the environment type and access level. We recommend explicitly marking production resources as the production environment, and granting read-only or operable permissions according to member responsibilities.
Binding steps (all four resource types share one three-step wizard):
- Go to Enterprise Resources and click Bind resource.
- Step 1 · Choose type: select code repository, database, virtual machine, or object storage.
- Step 2 · Connection info and credentials: fill in the display name and connection info, and enter credentials separately in the Credentials (written to the secret store) field. Credentials must not be placed in the connection info — the page will block that and warn you. When editing an existing binding, leaving the credential field empty keeps the original credential; filling it in replaces it.
- Step 3 · Environment and access level: choose Production or Non-production, and choose Read-only or Operable. You cannot save without selecting an environment.
- When the combination is Production + Operable, you must check the confirmation box before saving.
- Click Save to complete the binding. If you see a notice that the binding was created but the credential wasn't written, open that binding from the list and fill in the credential — don't create a duplicate.
Preparation: For a code repository, prepare the repository address and a token with the appropriate read/write permissions; for a database, prepare the connection address, database name, and account credentials; for a virtual machine, prepare the host address and login credentials. Always enter this information in the wizard — never write it into documentation examples.
About access level: This choice is recorded on the binding for governance and review; it does not change the permissions of the underlying credential itself. The actual scope of operations is still determined by the credential stored at binding time; code repository bindings currently use a read/write token.
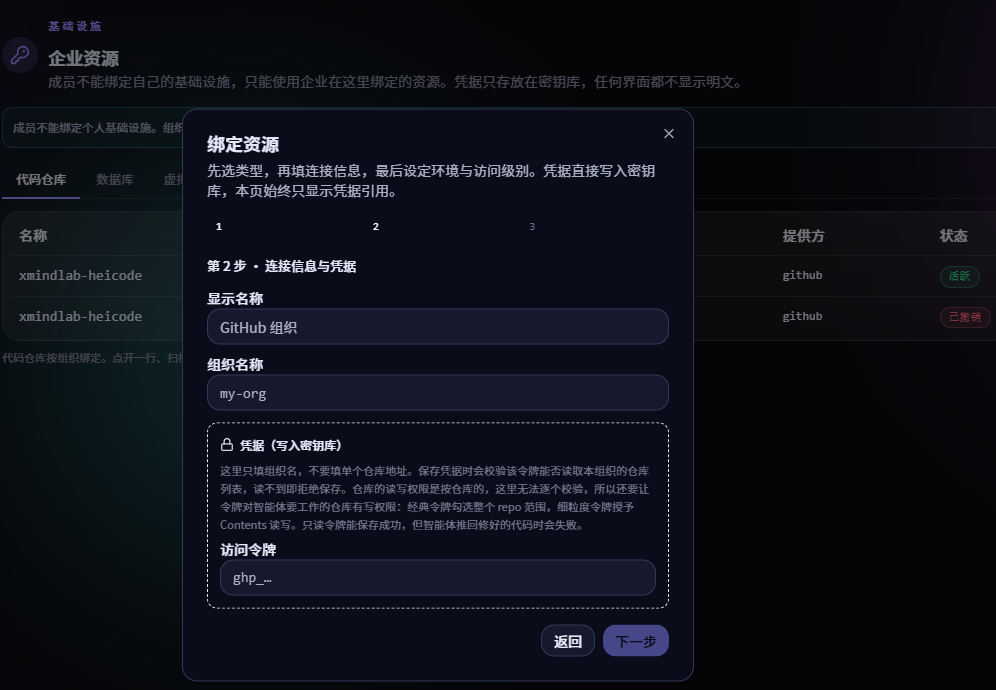
After a resource is bound, it must also be granted to specific members or roles. Ungranted resources do not appear in member views; once a grant is revoked, the corresponding usage permission immediately becomes invalid. To enable resource granting, contact service support.
1.3 Register Projects and Complete Approval
One code repository corresponds to one project. A project should have a requirements document and a technical design, and the organization owner completes the technical design approval.
Once a technical design is submitted for approval, the related documents are locked and cannot be modified during the approval period. After approval passes, the project enters the enabled state; if it is rejected, the documents are unlocked and project members can revise per the rejection comments and resubmit.
Documents are saved with versioning. Each save produces a new version, and historical versions are retained so you can trace exactly what the approval was based on.
If the organization has enabled project admission control, projects that haven't passed technical design approval cannot use governed Agents and resources.
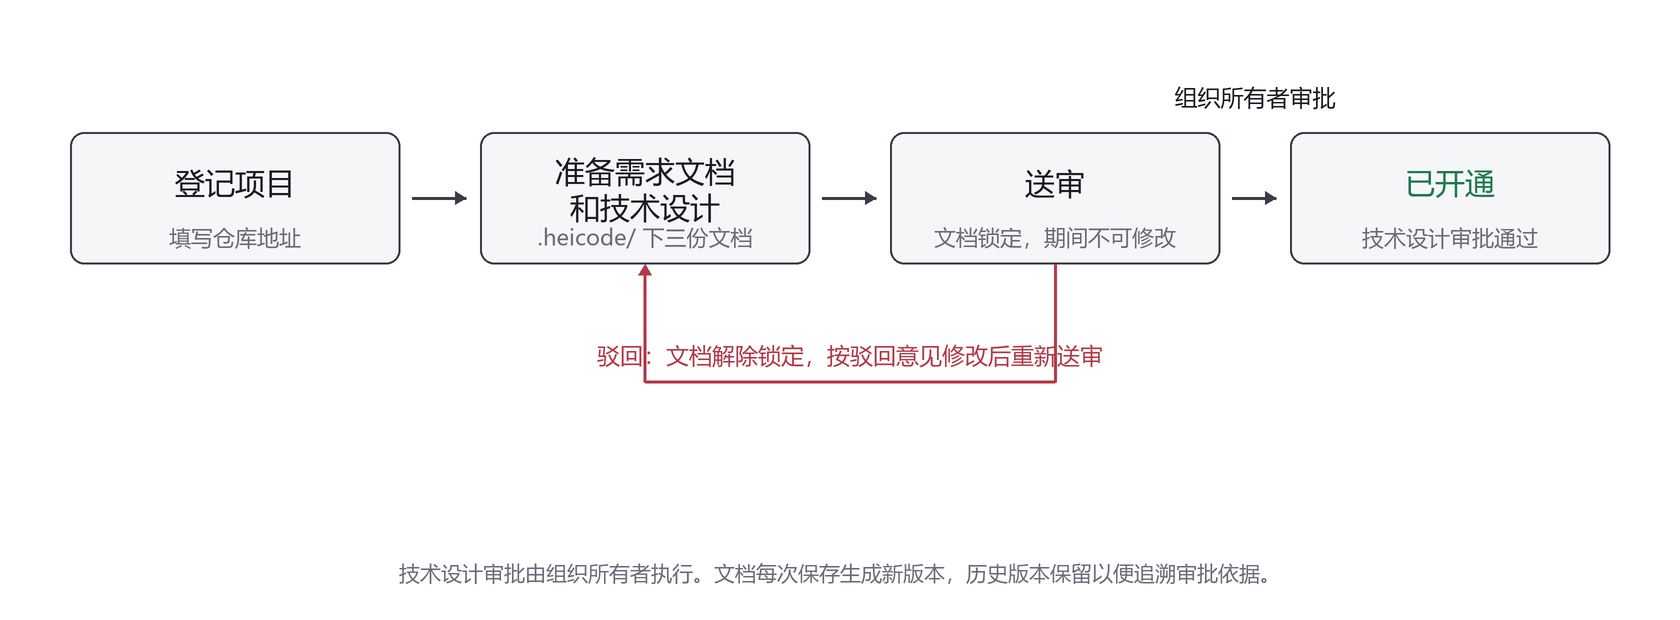
Steps:
- Go to Projects Overview and click Register project; fill in the repository address (required) and project name (optional). A newly registered project is Not enabled.
- The three documents are the requirements document, technical design document, and task breakdown document, authored and saved in the Technical Design Workbench. The project detail page is read-only.
- Once documents are ready, click Submit for approval on the project detail page. The status becomes Submitted, and the related documents are locked during approval.
- In Projects Overview, filter by Enablement status to see progress: Enabled / Pending review / Not enabled.
- After a rejection, the project returns to Not enabled, documents are unlocked automatically, and the project detail page shows the rejection comments. Revise per the comments and resubmit.
Note: Only the organization owner can approve or reject a technical design.
2. Organization & People
2.1 Invite Members
You can invite members to the enterprise organization by email and specify admin or member identity at invitation time. Multiple emails can be entered at once, and you can choose to assign a seat automatically when the invitee accepts.
Once the invitee signs in via the link in the email and accepts, they join the organization. If auto seat assignment is set and the organization still has a free seat, a seat is assigned at the same time.
The invitation records show email, target identity, inviter, send time, status, and expiry, and invitations can be resent or revoked. Once revoked, the original invitation link becomes invalid immediately.
Steps:
- Go to Organization & People and switch to the Member invitations tab.
- In Email (separate multiple with commas), enter invitee emails — one or many.
- Choose Role: admin or member. Only the organization owner can invite admins; admins can only invite members.
- To assign a seat automatically on acceptance, check Assign a seat when the invitation is accepted.
- Click Send invitation. If the platform has no mail service configured, the page provides a dedicated acceptance link for that invitee, which you must forward yourself.
- In the Pending list you can view email, target role, inviter, send time, status, and actions, and Resend or Revoke an individual invitation. Once revoked, the original link becomes invalid immediately.
Note: Pending invitations don't consume seats; once all seats are used, no further invitations can be sent.
2.2 Manage Members and Seats
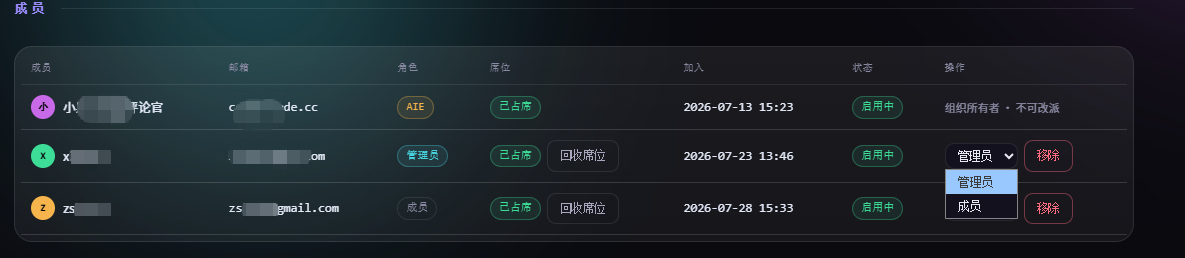
The member management page shows the members in the organization, their identity, and seat status, and provides these actions:
- Adjust member identity;
- Assign or reclaim seats;
- Remove members.
A seat controls whether a member can sign in from the development client and use models, Agents, and enterprise resources. After a seat is reclaimed, the member remains in the organization but can no longer use those capabilities from the development client.
The organization owner account's identity is fixed. Technical design approval and rejection are performed by the organization owner; admins can maintain configuration and resources, invite members, and author and submit project documents.
2.3 Global Configuration
See section 1.1 for how to use global configuration.
2.4 User Data and Privacy
An organization can export a member's personal data for data portability or compliance inquiries. The export file contains no tokens, passwords, or credential references.
3. Tools & MCP
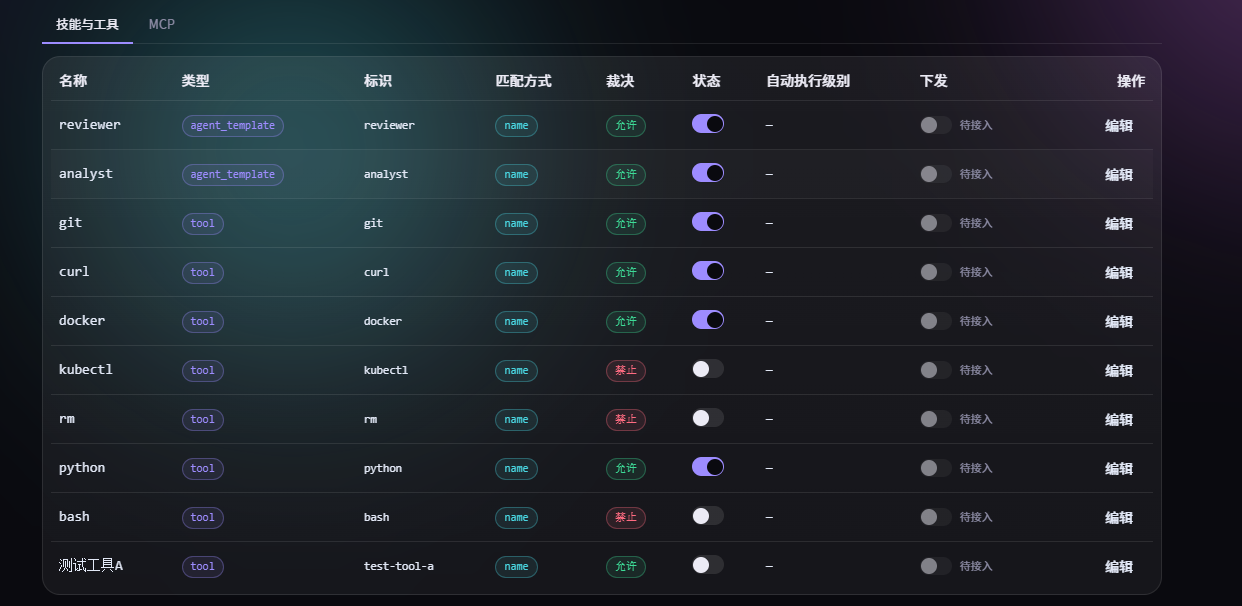
Organizations can manage the MCP connections, skills, tools, and Agent templates available to members through the capability catalog.
Each capability shows its name, type, identifier, status, and execution setting. The organization can allow or deny a capability, and after configuring, run a dry run to check whether a given capability is available under the current rules.
To enable capability-catalog enforcement, contact service support. Once enabled, Agents or external capabilities not allowed by the enterprise are not made available to members.
Steps:
- Go to Tools & MCP and review existing entries in the list: name, type, identifier, status, and auto-execution tier.
- Click Add entry to create a rule, filling in the type and identifier. Type plus identifier together form the rule's identity and cannot be modified after creation; to change them, add a new entry.
- Set the entry to Allow or Deny. When both allow and deny match, deny wins.
- Use the Enabled switch to control whether an entry takes effect. Deleting entries is not currently supported — disable them instead.
- Use the dry run to check the verdict: enter a tool, skill, or MCP connection, and the page reports whether it would be allowed or denied under the same rule set.
Note 1: MCP connections are matched by address or launch command, not by display name, so they cannot be impersonated.
Note 2: The auto-execution tier is currently only saved and not yet pushed to the client, so the setting has no runtime effect.
Note 3: Capability-catalog enforcement requires the platform to enable it separately and is not yet enabled; until then, these rules do not block members' actual calls.
4. Agent Management
4.1 Capability Catalog
The Agent list shows the Agents available in the organization, including name, identifier, model used, source, and purpose.
Which Agents members can actually use is determined by the enterprise capability catalog.
4.2 Runtime Observation
The runtime observation page shows currently running Agent instances, including instance identifier, owning project, run mode, status, and start time.
Admins can view run logs or stop a run. Credential fields in logs are redacted. Stopping interrupts the current work and requires a second confirmation.
5. Enterprise Resources
The Enterprise Resources page shows bound code repositories, databases, virtual machines, object storage, and cloud accounts by type.
Binding a resource completes these settings in order:
- Choose the resource type;
- Fill in connection info and credentials;
- Set the environment type and access level.
Credentials are stored in the secret store; the interface, logs, and APIs show only credential references, never plaintext.
In the resource details you can view resource type, name, environment type, access level, and credential reference, and perform these actions:
- Modify connection info, environment type, or access level;
- Rotate credentials;
- Unbind the resource;
- Grant the resource to members or roles, or revoke an existing grant.
Unbinding a resource also deletes the related credentials from the secret store, and requires a second confirmation.
Steps:
- Go to Enterprise Resources and open a binding from the list to see resource type, name, environment, access level, and credential reference.
- Modify connection info, environment, or access level, then save. Leaving the credential field empty keeps the original credential.
- Rotate credentials: enter the new credential in the credential field and save; the new credential is written to the secret store and replaces the original reference. If you see a notice that changes were saved but the new credential wasn't written, reopen that binding and re-enter the credential.
- Unbinding requires a second confirmation; once confirmed, the related credentials in the secret store are deleted as well.
Note: Only the creator of a binding can modify or unbind it; the interface, logs, and APIs always show only the credential reference, never plaintext.
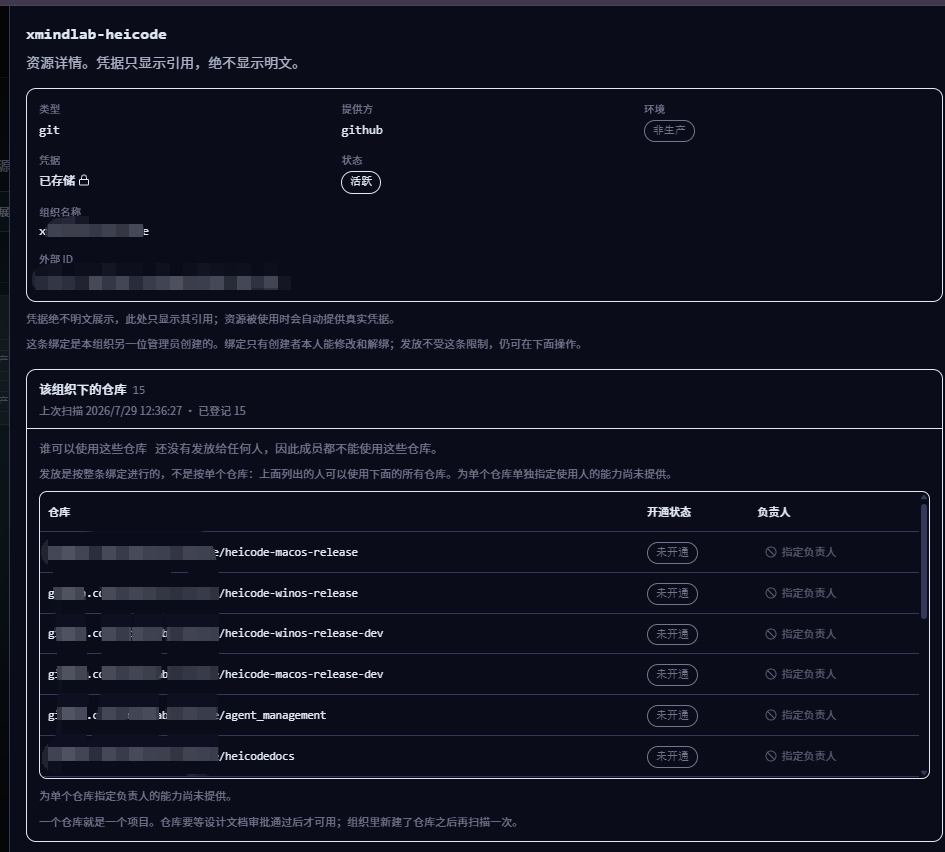
Once a GitHub organization is bound, you can scan the repositories under it and register projects in bulk. Already-registered projects are not created again and their existing approval status is unchanged; archived repositories are not registered.
Steps:
- First bind the GitHub organization as described above (bound by organization; Gitea and GitLab are bound per repository).
- In that binding's details, expand Repositories under this organization and click Start scan. The page shows the Last scan time, or a notice if it has never been scanned.
- When the scan completes, the page shows how many repositories the organization returned and how many were registered as projects.
- Already-registered projects are not created again and existing approval status is unchanged; archived repositories are not registered.
Note: Grants apply to an entire binding — the listed users can use all repositories under that binding; specifying users for an individual repository is not supported. A repository's owner field is a record only and neither grants nor restricts any access.
6. Projects Overview
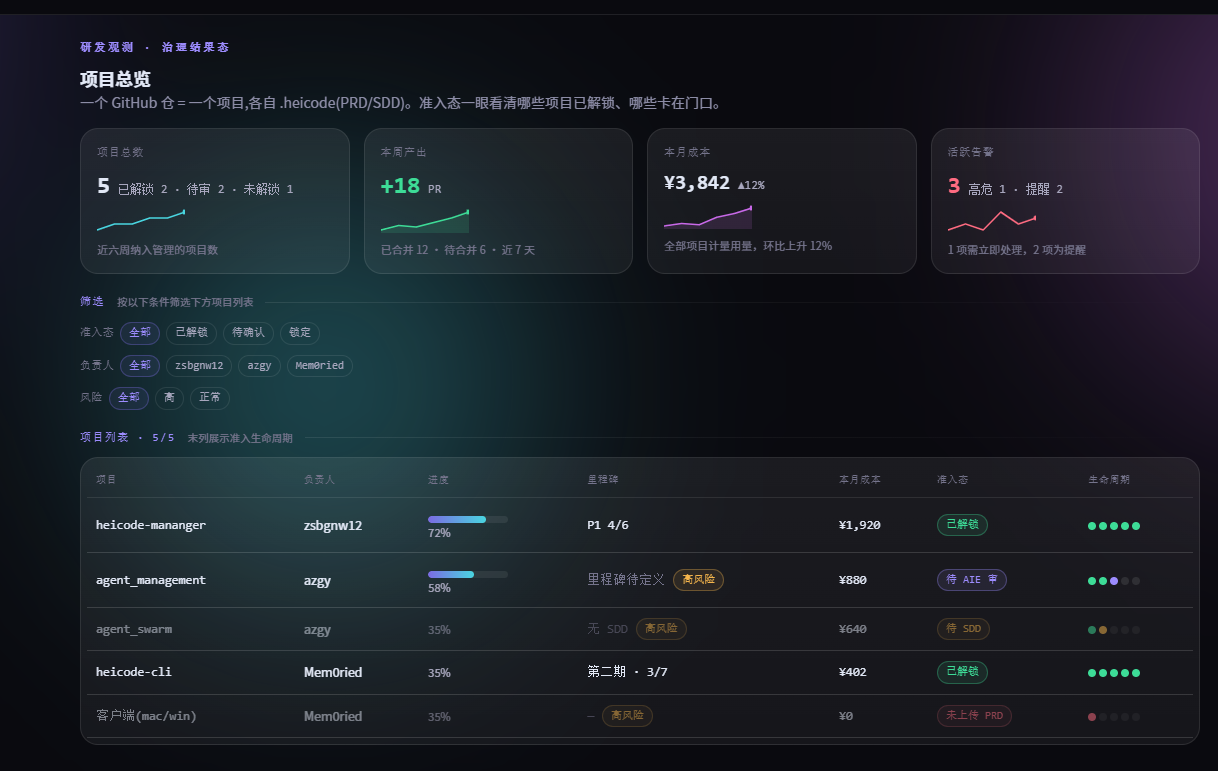
Projects Overview is used to view all projects in the enterprise and their enablement status.
Project statuses include:
- Enabled: the technical design has passed approval;
- Pending review: the technical design has been submitted and is awaiting the organization owner;
- Not enabled: not yet submitted, or the approval was rejected.
The project list shows project name, repository address, submission time, review time, and enablement status, and supports filtering by status. Click a project to open its details.
When registering a new project, the repository address is required and the project name is optional. Newly registered projects default to Not enabled.
7. Project Details
Project details show the repository address, enablement status, submission time, and review time. If the project was ever rejected, the rejection comments are shown as well.
7.1 Milestones and Technical Design
Milestones and sections in a project come from the task breakdown document and don't need to be re-entered on the page. To change the plan, edit the corresponding document directly. After saving, the system generates the list in document order and indicates which document version is in use.
The list shows milestone and section names, planned start dates, target dates, and their position in the document. Sections appear under the milestone they belong to.
If the document contains content that doesn't match the required format, the page shows the source location and a fix hint so it can be corrected promptly.
Format Specification
Milestones and sections are parsed from the body of the technical design document; the page provides no separate entry form — edit the document to change the plan. The current format version is SDD_PLAN_FORMAT_V1.
-
Anchor heading
Milestones must be written under an anchor heading. The anchor is the first Markdown heading (starting with
#) whose text matches the anchor vocabulary; leading numbering and trailing colons are stripped before comparison. The anchor vocabulary includes: 里程碑, 里程碑规划, 里程碑计划, 里程碑与小节, 实施计划, 交付计划, 开发计划, as well as Milestones, Milestone, Milestone plan, Implementation plan, Delivery plan, Development plan. Headings outside the anchor take no part in parsing, and only the first anchor in the document is used. -
Levels relative to the anchor
A milestone is the anchor level plus one; a section is the anchor level plus two. If the anchor uses one
#, milestones use two and sections use three. -
Attributes immediately follow the heading
Attributes are the consecutive unordered list items (starting with
-,*, or+, possibly with blank lines between) that immediately follow the heading line. The attribute area ends at the first line that is neither a list item nor blank. Body text between the attributes and the next heading is free-form description and is not parsed. -
Keys and values
The target-date key may be written as: 目标日期, 目标完成日期, 截止日期, 交付日期, 完成日期, due, due date, deadline, target date. The start-date key may be written as: 开始日期, 计划开始日期, 起始日期, start, start date. Keys are case-insensitive, and either Chinese or ASCII colons work. Date values must always use the
YYYY-MM-DDformat.
7.2 Project-Level Configuration
Project-level configuration adds project-specific restrictions on top of the enterprise global configuration. Project-level configuration can only add restrictions — it cannot remove restrictions already in effect from the global configuration.
Steps:
- Go to Projects Overview and open the target project to see its details.
- Find the Project rules block. These rules are written to
.heicode/config/in the repository and read before work begins. - Turn on additional restrictions as needed under Project guardrails. Switches in this block only stack on top of the enterprise global restrictions and can only tighten, never loosen — the interface labels this "stacked on global · tighten only".
- After saving, you can review the generated rule document content under
.heicode/config/preview.
Current limitation: When no rule document has been pushed for the project, the block shows "No documents have been pushed yet — add one below, or wait for existing project rules to be integrated"; Project guardrails shows "Waiting for pushed project rules to be integrated" when unset. Integration of pushed project rules is not yet complete, so this block is currently used mainly for adding and previewing.
8. Pending My Approval
Pending My Approval is the workbench where the organization owner handles approval items.
The page shows whether enterprise governance conditions are ready, and summarizes the number of pending approvals, the longest wait time, and recent approval activity.
The approval queue shows project, repository, submission time, and wait duration. The organization owner can approve or reject:
- After approval, the project enters the enabled state;
- When rejecting, comments are required; the project returns to Not enabled and the related documents are unlocked.
The workbench also provides a high-risk operation log for reviewing operations recently blocked by the platform or requiring human confirmation. Records include time, verdict, operation type, target, operator, and outcome, and support filtering and export. The content is redacted at write time and contains no credentials.
Steps:
- Go to Pending My Approval. The page shows the pending count, longest wait time, and this week's approve/reject ratio.
- In the Approval queue, review project, repository, submission time, and wait duration; open any entry to review it in the Technical Design Workbench.
- Click Approve and the project becomes enabled. Only the organization owner can decide on a technical design; other roles can view the queue and open entries, but the decision buttons are unavailable.
- Comments are required when clicking Reject. After rejection, the project returns to Not enabled and the related documents are unlocked.
- The High-risk operations block shows operations recently blocked by the platform, with filtering and export. Records are redacted at write time and contain no credentials.
Current state worth noting: The high-risk operation log only contains verdicts produced by the platform itself, and records are only produced after the platform enables the corresponding enforcement capability; until then the block is empty. An empty list here means the platform has not recorded any verdict — it does not mean no high-risk operations have occurred in the organization.
9. Technical Design Workbench
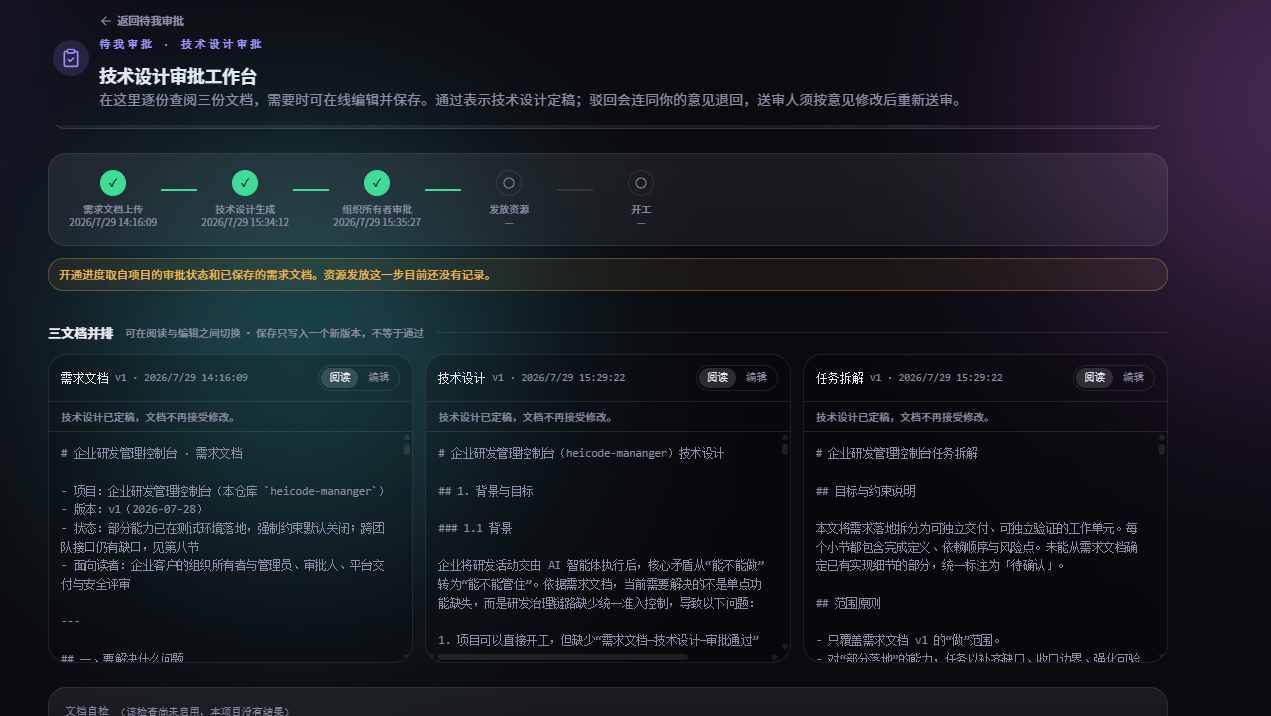
The Technical Design Workbench is used to review a project's technical design.
The page shows project, repository, submission time, and current status, and presents the project's progress from document preparation through approval, resource granting, and starting work.
The three project documents can be viewed side by side. Each document offers a preview and a source view, and the organization owner can modify content while editing is permitted. Each save generates a new version and shows the version number and write time.
While a project is Pending review or Enabled, the related documents cannot be modified; after a rejection, documents are unlocked automatically.
The organization owner can approve or reject the technical design as a whole. Rejection requires stating the problems and revision comments.
Steps:
- Open an entry from the Pending My Approval queue, or go to the Technical Design Workbench directly. The page shows project, repository, submission time, and current status.
- The three documents can be viewed side by side, each with preview and source views that you can switch between at any time.
- Modify content while editing is permitted, then save. Each save generates a new version and retains the previous one; the page shows the version number and write time. When there is unsaved content, it warns "Unsaved changes — saving writes a new version and keeps the previous one".
- Prerequisites for editing documents: the project is in draft or rejected state, and the current account is the organization owner or an admin. Documents cannot be modified while the project is Pending review or Enabled; after a rejection they are unlocked automatically.
- When the review is complete, Approve or Reject as a whole. Rejection requires stating the problems and revision comments.
Note: Only the organization owner and admins can edit documents; only the organization owner can approve or reject a technical design.
10. Development Data
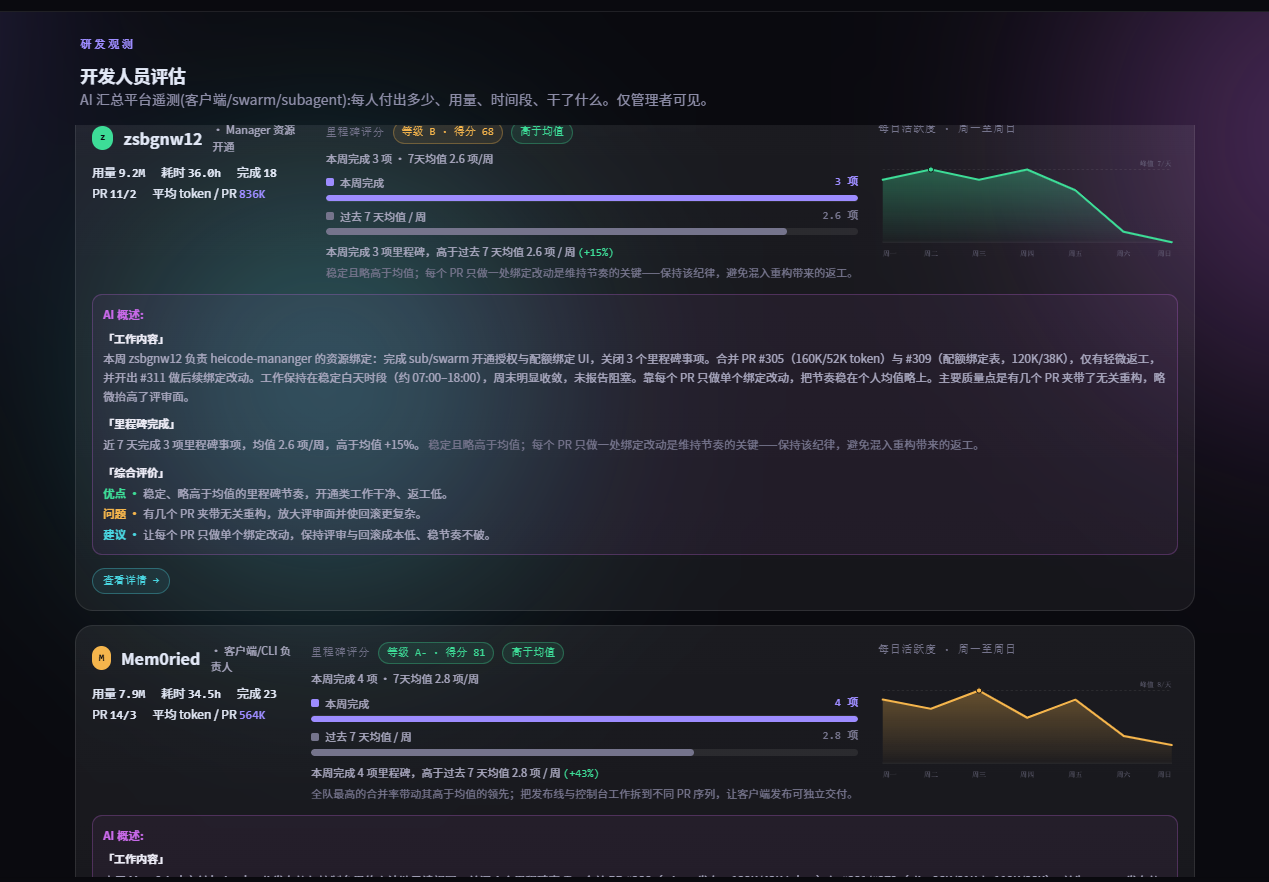
The Development Data page is only open to the organization owner and admins, and supports viewing the last 7 or 30 days.
10.1 Member Data
The page shows cost per member, number of completed tasks, average cost per task, and task completion relative to usage.
When there is no completed-task record, average cost per task shows No data, to avoid mistaking missing data for zero cost.
10.2 Visibility Scope
Management-side data is used to understand work effort and task completion. Members can only view their own data — not other members' data or rankings between members.
11. Cost & Tokens
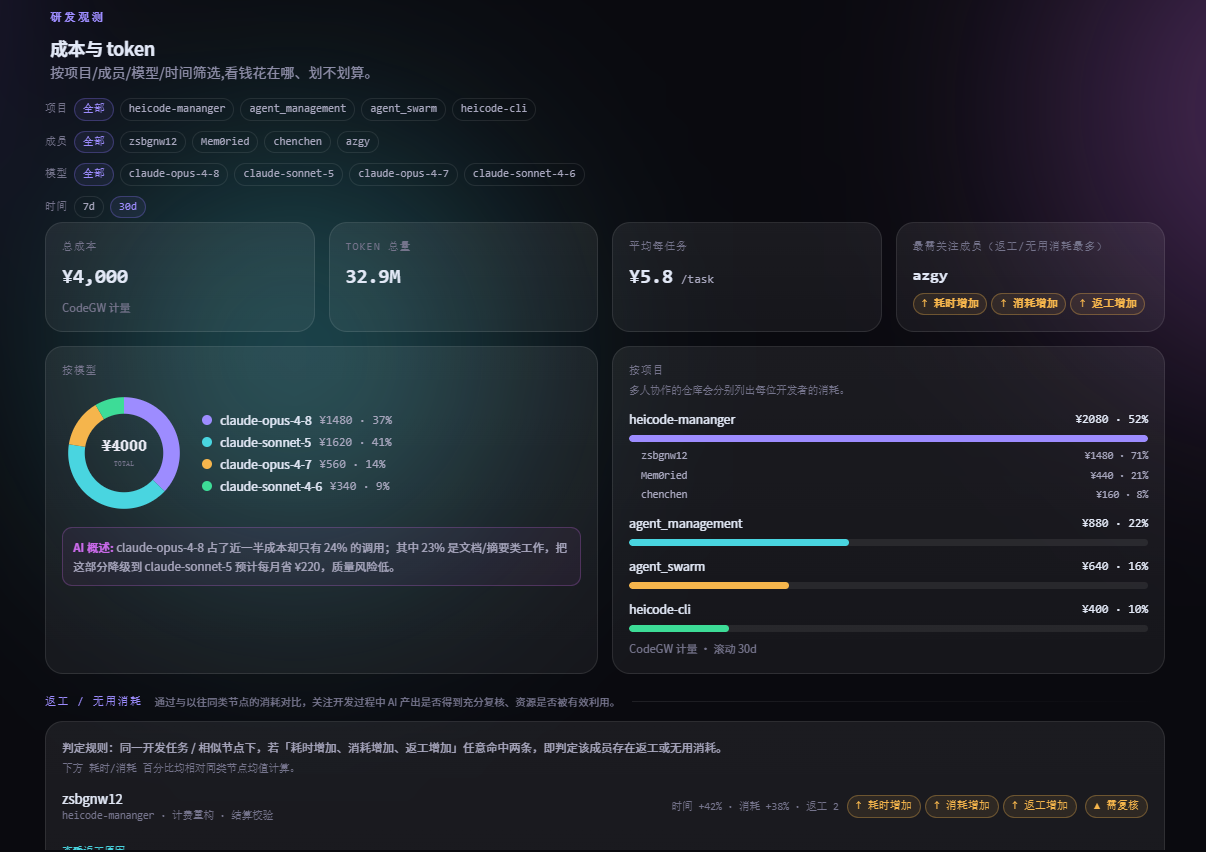
The Cost & Tokens page is only open to the organization owner and admins, and supports viewing the last 7 or 30 days.
11.1 Aggregate Metrics
The page shows total cost, total tokens, and average cost per task for the time range, plus a comparison with the previous period of the same length.
Average cost per task is calculated as total member consumption divided by total completed tasks; it is meant for observing overall trends and does not represent per-task itemized billing records.
11.2 Breakdown Dimensions
Cost data can be viewed in these ways:
- By model: consumption and share per model;
- By member: consumption and share per member;
- By day: consumption for each day in the selected range.
Collaboration tasks and Agent runtime are billed by time and are shown separately from model calls.
12. Data Boundaries and Security
- Credential protection: tokens and passwords are stored in the secret store; the interface, logs, and APIs never show plaintext;
- Enterprise resource management: members can only use resources the enterprise has bound and granted;
- Organization isolation: data, configuration, resources, and projects are isolated between organizations;
- Member data isolation: members can only access data related to themselves;
- Approval permission control: only the organization owner can approve or reject a technical design;
- Conversation privacy: the management side does not display conversation content or prompt bodies;
- Audit redaction: credential content is never written to audit records.
13. Glossary
| Term | Description |
|---|---|
| Organization owner | The highest-privilege account of an enterprise organization, responsible for key approvals such as technical design |
| Admin | Responsible for day-to-day management, configuration, resources, and project document maintenance |
| Member | A person who uses enterprise capabilities and resources to do development work |
| Seat | The permission for a member to sign in from the development client and use enterprise capabilities |
| Project | A management unit corresponding to one code repository |
| Requirements document | A document describing project goals, scope, and acceptance requirements |
| Technical design | A document describing the project's implementation plan and submitted for approval |
| Milestones and sections | Project plan content identified from the task breakdown document |
| Resource binding | The process by which an enterprise registers and manages development resources |
| Resource granting | Granting members or roles the right to use an enterprise resource |
| Global configuration | The set of rules the enterprise pushes uniformly to all members |
| Capability catalog | The list through which the enterprise manages MCP, skills, tools, and Agent templates |
| Credential reference | An identifier pointing to a credential in the secret store, containing no credential content |
| Agent | The AI execution unit that carries out specific development tasks |
| Collaboration task | A task completed jointly by multiple Agents |
Last updated on
Spec-Driven Development (SDD) Standard
Turn a PRD into a reviewable, executable spec first, then let the Agent plan, break down, and execute: PRD → spec.md → plan.md → task.md → code.
Project Repository PRD Onboarding Guide
Onboard Heicode Agents in your own repository: commit .heicode/prd.md, the milestone plan format, scan statuses, and project statuses.