Create Your First Agent
Create Your First Agent
This page describes how to create your first Agent task from scratch. You'll go through entering a goal, connecting resources, confirming roles, confirming the budget, and launching.
When you need to create an Agent
Good scenarios for creating an Agent:
- Generating an MVP from a product idea.
- Adding a feature to an existing project.
- Fixing a complex bug.
- Generating or organizing documentation.
- Running tests and code reviews.
- Deploying to a cloud environment.
- Doing a security check or permissions remediation.
Scenarios where creating an Agent is not recommended:
- The goal is unclear.
- There's no resource authorization.
- There are no acceptance criteria.
- You want to bypass human approval to operate on production.
- You want the Agent to hold plaintext secrets long-term.
Step 1: Write a clear goal
A good goal should include:
- Background.
- Expected outcome.
- Existing resources.
- What's not allowed.
- Acceptance criteria.
Recommended template:
Task name:
Background:
Outcome to accomplish:
Existing code or documentation:
Target environment:
What's not allowed:
What requires approval:
Acceptance criteria:
Example:
Task name: Add a legal resources page to the website
Background: The website needs to show privacy, secret vault, and legal notices.
Outcome to accomplish: Generate an in-site page and Markdown documentation.
Existing code or documentation: the website directory, the docs/legal directory.
Target environment: Azure Static Web Apps.
What's not allowed: Don't change the login system, don't expose secrets.
What requires approval: Production deployment.
Acceptance criteria: The page is accessible, and the documentation can be used directly by the docs site.
Step 2: Confirm the task type
Choosing a task type helps Heicode recommend roles.
| Task type | Recommended roles |
|---|---|
| New product | planner, architect, executor, code-reviewer, qa-tester |
| Feature iteration | planner, executor, code-reviewer |
| Bug fix | debugger, code-reviewer |
| Documentation | document-specialist, code-reviewer |
| Deployment | explorer, code-reviewer |
| Security remediation | security-reviewer, code-reviewer, architect |
Heicode provides 19 Agent role templates (such as analyst, architect, code-reviewer, debugger, designer, executor, planner, qa-tester, security-reviewer, etc.), and you can freely combine them based on the task's needs. If you're not sure of the task type, you can let Heicode recommend one automatically based on the goal.
Step 3: Choose a working mode
The working mode determines how the Agent splits up tasks, how it collaborates, and when it needs your confirmation.
Sub mode and Swarm mode are two collaboration styles: in Sub mode, a main Agent splits tasks and explicitly assigns them to sub-agents; in Swarm mode, on a tenant-level virtual machine, a lead Agent receives the task, breaks it down, and dispatches it to worker Agents for execution — up to 8 workers, 3 by default (adjustable by plan). This is not free-form self-organization with an unlimited number of roles.
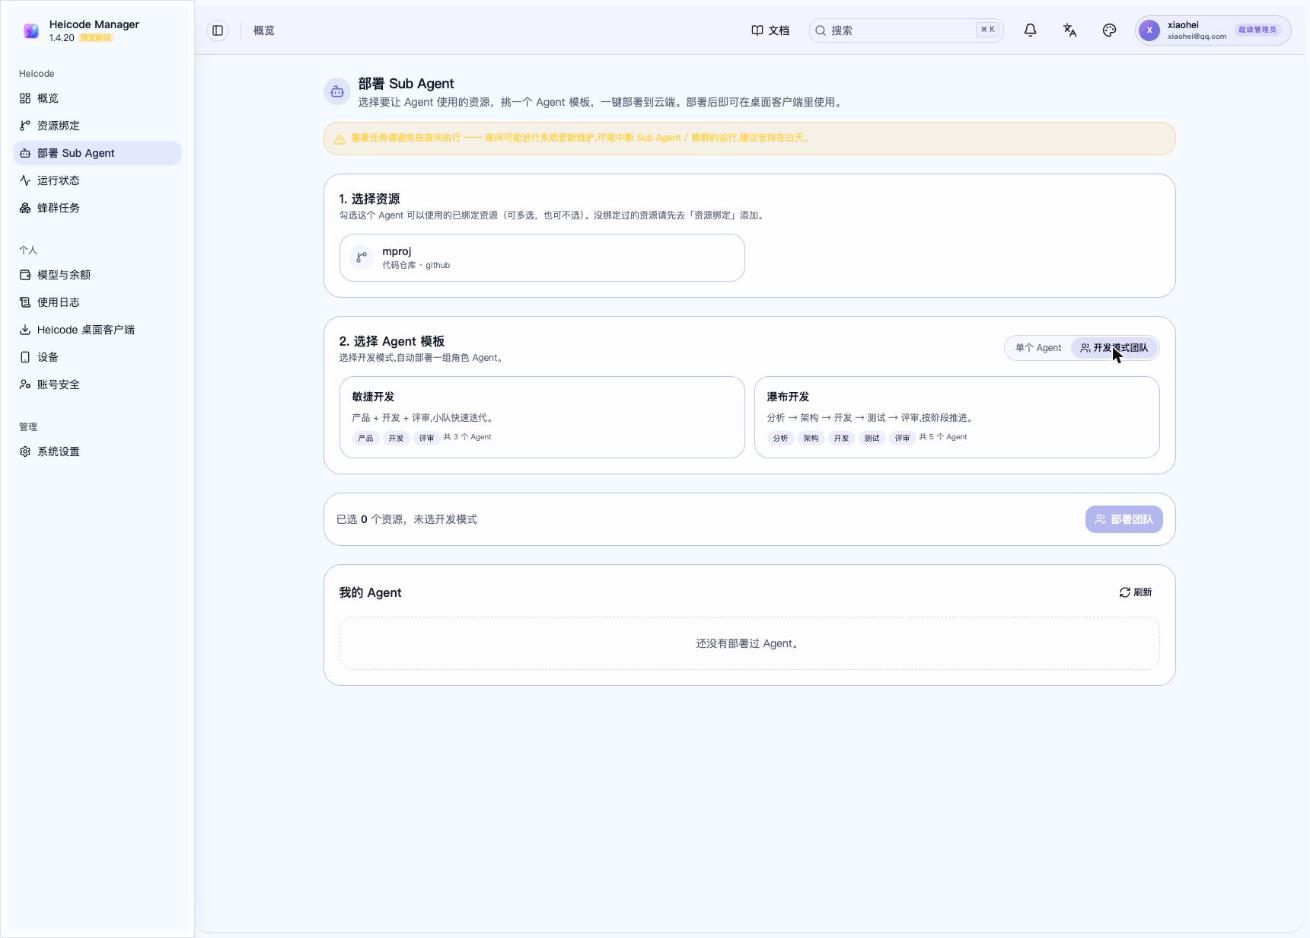
Waterfall mode and Agile mode correspond to the two fixed templates in the one-click "Dev Mode Team" deployment feature, with fixed roles and headcounts:
- Agile template: Product (planner) + Dev (executor) + Review (code-reviewer), 3 roles total.
- Waterfall template: Analysis (analyst) + Architecture (architect) + Dev (executor) + QA (qa-tester) + Review (code-reviewer), 5 roles total.
| Mode | Good fit | Not a good fit |
|---|---|---|
| Sub mode | Clear subtask boundaries, multi-role division of labor, complex troubleshooting, code review | Small tasks, tasks generated dynamically |
| Swarm mode | Exploring multiple directions, dynamically generated tasks, parallel processing across multiple workers, large-scale review | Very tight budget, unclear acceptance criteria, unclear production high-risk boundaries |
| Waterfall mode (fixed 5-role template) | Clear requirements, fixed stages, production releases, legal or compliance content | Goal still being explored, need for frequent trial and error |
| Agile mode (fixed 3-role template) | MVP, product iteration, UI adjustments, multiple rounds of feedback | No one to accept the work, one-off migrations, or strictly sequential releases |
Recommended way to choose:
- If subtask boundaries are clear, start with Sub mode for controlled decomposition.
- If the task needs multiple workers exploring in parallel, choose Swarm mode.
- If you already know what to build and the risk is high, one-click deploy the Waterfall team template.
- If you want to ship a first version and adjust afterward, one-click deploy the Agile team template.
- For large tasks, combine modes: explore with Sub or Swarm mode first, then switch to the Waterfall or Agile template once the approach has stabilized, to drive formal delivery.
See Choosing an Agent Working Mode for details.
Step 4: Connect a Git repository
If the task needs to read or write code, connect a Git repository.
Steps:
- On the Resource Binding page, click Connect Git.
- Choose the repository.
- Choose the branch.
- Set the paths allowed for reading.
- Set the paths allowed for writing.
- Set whether branch or PR creation is allowed.
Recommended permissions:
| Scenario | Recommended permission |
|---|---|
| Analysis only | Read-only |
| Small fix | Read/write on the current branch |
| New feature | Read/write on a new branch, PR allowed |
| Production hotfix | Approval required before write |
Step 5: Connect documentation
Documentation helps the Agent understand the product and project.
Recommended to connect:
- Product descriptions.
- Requirements documents.
- API documentation.
- Architecture documentation.
- Design specs.
- Test cases.
- Release notes.
Documentation is read-only by default. Only when you explicitly allow it can the Agent responsible for the task write to the docs directory.
Step 6: Connect an SK skill library
The SK skill library is used to tell the Agent team standards and specific ways of working.
Can include:
- Coding standards.
- Frontend design standards.
- API standards.
- Testing standards.
- Deployment procedures.
- Security checklists.
- Documentation templates.
Recommendations:
- Only enable the SKs the current task needs.
- High-risk SKs are disabled by default.
- SKs that touch shell, cloud resources, databases, or deployment must be under approval control.
- Use a pinned version or snapshot to avoid rules changing mid-task.
Step 7: Connect cloud resources
If the task needs to deploy or access cloud resources, connect a cloud account.
Once connected, Heicode automatically discovers available resources.
You need to confirm:
- Which resources can be used for this task.
- Which environments can be used.
- Which resources are read-only.
- Which operations require approval.
Production resources should not be opened up to ordinary tasks by default.
Step 8: Confirm Agent roles
Heicode will recommend sub-agents.
Example:
| Role template | Responsibility for this task |
|---|---|
| planner | Organize requirements and acceptance criteria |
| executor | Modify pages and interactions |
| code-reviewer | Check diffs and risk |
| qa-tester | Build and deploy verification |
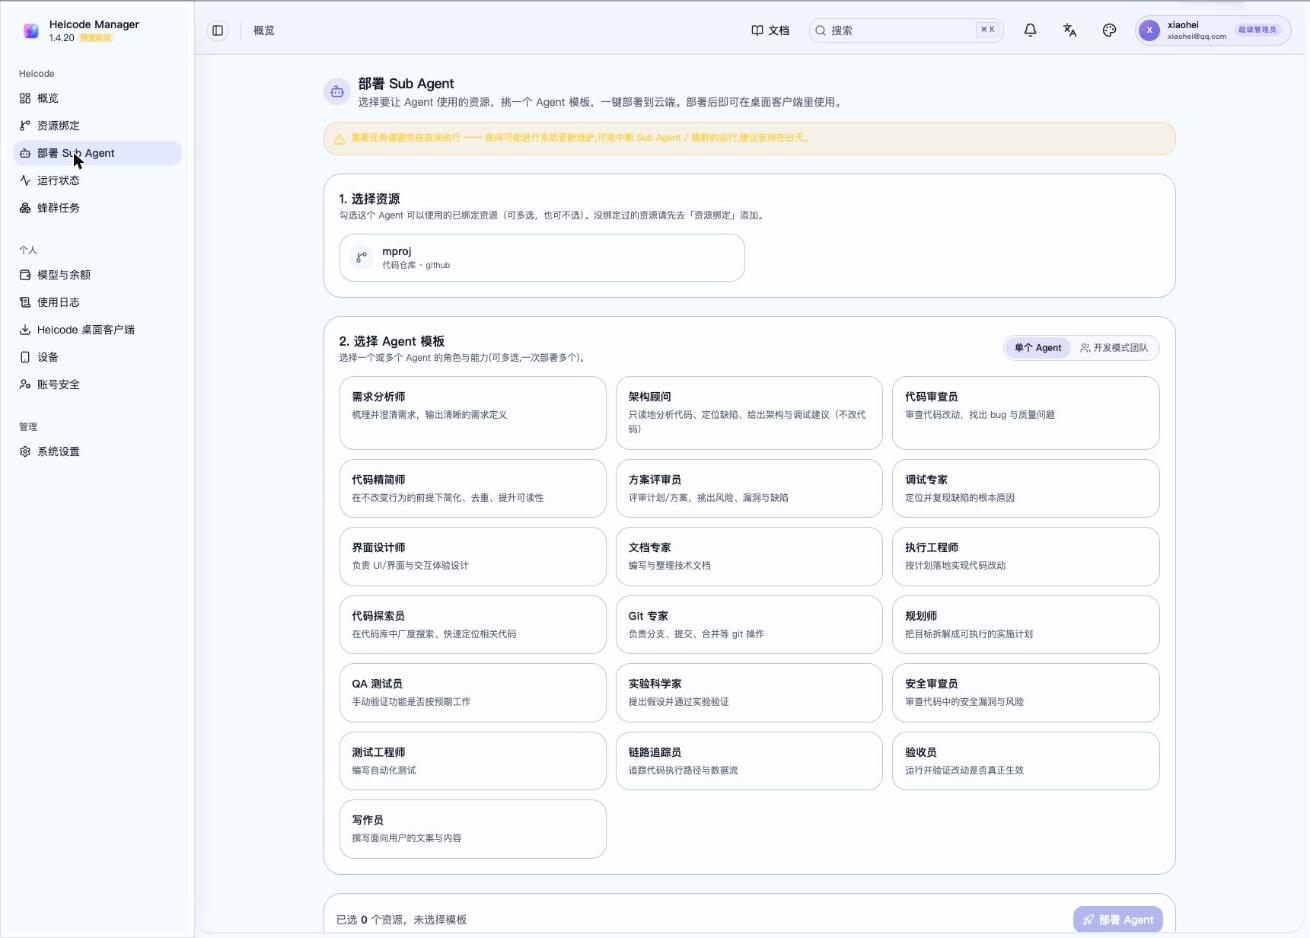
You can reduce or add roles.
Recommendations:
- In Sub mode, you can add multiple sub-agents with clearly defined responsibilities.
- In Swarm mode, roles show up as lead and worker: the lead is responsible for receiving the task and breaking it down for dispatch, workers are responsible for claiming and executing subtasks — up to 8 workers, 3 by default (adjustable by plan).
- Waterfall mode uses a fixed 5-role template (analyst, architect, executor, qa-tester, code-reviewer); one-click deployment already includes all the roles.
- Agile mode uses a fixed 3-role template (planner, executor, code-reviewer).
- Don't create roles without clearly defined responsibilities.
- Don't let the same Agent be responsible for development, review, and deployment approval at the same time.
- Don't give all roles the same permissions.
Step 9: Confirm the budget
The platform enforces a hard cap on any single Agent's budget: at most 500,000 tokens, at most $200 in cost, and a maximum runtime of 24 hours — exceeding any one of these gets rejected by the platform and returns BUDGET_EXCEEDED. You do not need to manually configure budget parameters when creating a task.
Step 10: Launch the Agent
Before launching, confirm:
- The goal is clear.
- The working mode has been chosen.
- Resources are connected.
- The roles are reasonable.
- Permissions are minimal.
- The budget has been set.
- Approval rules have been set.
- Acceptance criteria are clear.
After clicking Launch, the Agent enters the task view.
You can close the page and come back later. The task status is preserved in Heicode.
Last updated on